In the shattered epochs of Last Epoch, where timelines bleed together and ancient powers wage war across ages, one constant remains: the power to reshape reality lies at your fingertips. Unlike other ARPGs where crafting is an endgame luxury for the elite, Last Epoch welcomes every Traveler—from the moment you first stagger out of the Ruined Era—to participate in one of gaming’s most accessible yet deeply strategic crafting systems. Here, every dropped item is not just potential power, but potential material for the masterpiece you will create. The forge becomes your constant companion, as integral to your journey as your skills and passives, transforming random loot from the capricious currents of time into tools of deliberate, calculated power.
This guide will teach you to see gear not as what it is, but as what it could be. We will walk through the fundamental mechanics that make the system tick, delve into the strategies that separate novice crafters from master artisans, and finally, step into the bleeding-edge techniques used to create the legendary items that can stand against the end of all things. Whether you’re looking to smooth your leveling experience or construct the perfect endgame weapon, understanding the forge is your key to unlocking true power in Last Epoch.
Last Epoch Crafting Core Mechanics
The Forge Interface
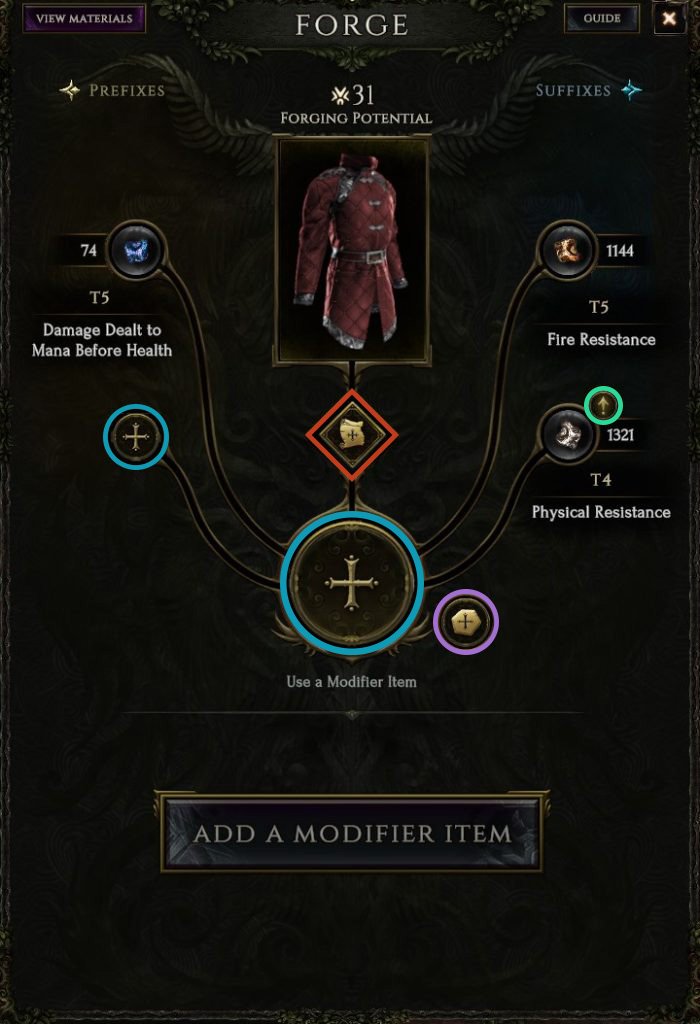
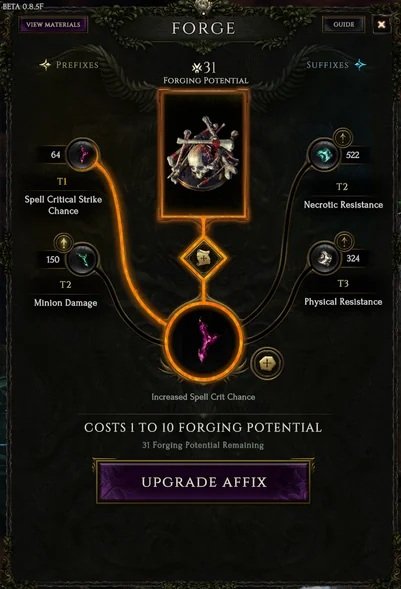
Accessing your crafting destiny is as simple as pressing ‘F’—no return to town required, no special NPC to seek. This intentional design choice means that every moment of inspiration, every lucky drop that could be immediately improved, can be acted upon instantly. The interface itself is a model of clarity: your item sits center stage, surrounded by slots for the materials that will transform it. To begin, simply shift+right click or drag an item into the crafting slot.
The most immediate limitation you’ll encounter is Forging Potential (FP). Think of this not as a frustrating barrier, but as the “inherent possibility” that lives within every piece of gear. Each craft—whether adding a new stat or upgrading an existing one—consumes a portion of this potential. Once it reaches zero, the item’s fate is sealed, and no further crafts can be performed. The key insight is that higher rarity items naturally contain more of this potential, with Exalted items often boasting 40+ FP, making them vastly superior crafting bases. Each craft consumes a variable amount within a displayed range, creating tense moments where you hope the laws of probability will grant you a favorable roll.
Affixes
Affixes are the statistical soul of your items, the modifiers that define their purpose and power. Understanding their structure is fundamental to mastering crafting:
Affix Slots and Their Dominions
| Slot Type | Maximum | Common Modifiers | Strategic Importance |
|---|---|---|---|
| Prefix | 2 | Damage Stats, Attributes, Minion Stats, Defenses | The primary source of offensive power and raw attributes. |
| Suffix | 2 | Health, Resistances, Mana, Status Effects | The bedrock of your defensive integrity and resource management. |
Every non-Unique item can have up to four affixes—two prefixes and two suffixes. Each affix can range from Tier 1 (lowest) to Tier 5 (highest) for normally craftable modifiers, while Exalted items can naturally drop with powerful Tier 6 or Tier 7 affixes that cannot be crafted normally. Each tier within an affix has a value range (e.g., 3-5 Strength), and when you upgrade a tier without special glyphs, this value is re-rolled.
Shards, Glyphs, and Runes
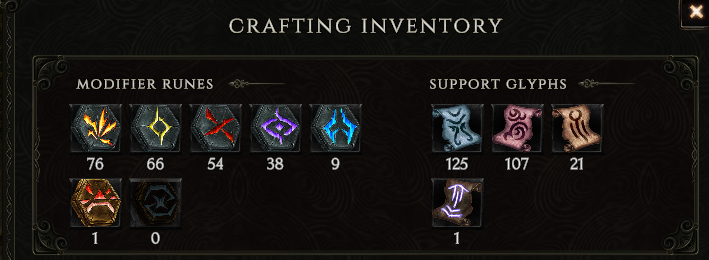
Your ability to reshape items comes from three categories of materials that you’ll collect throughout your journey. Learning their functions is the first step toward crafting mastery.
Essential Crafting Materials
| Material Type | Primary Function | Key Examples & Uses |
|---|---|---|
| Shards | Adding/Upgrading Affixes | Core stat shards (Health, Strength); Resistance shards; Damage-type shards. |
| Glyphs | Influencing Crafting Outcomes | Glyph of Hope: 25% chance to consume no FP. Glyph of Order: Preserves stat value when upgrading. Glyph of Chaos: Changes an affix to a random different one. |
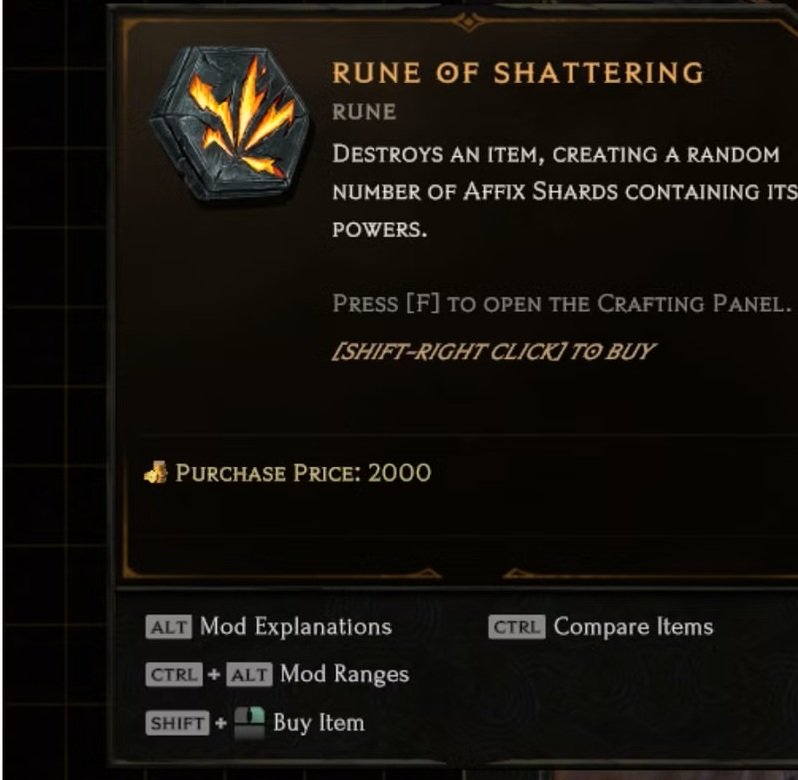
| Runes | Drastic Item Manipulation | Rune of Shattering: Destroys item for affix shards. Rune of Removal: Removes a random affix, refunding its shards. Rune of Ascendance: Turns a normal item into a random Unique. |
Material Acquisition and Management
Shards form the backbone of crafting, representing individual affixes in physical form. They are obtained primarily by using Runes of Shattering on unwanted gear, which destroys the item and has a chance to return shards for each affix it contained. A more targeted approach involves using Runes of Removal, which randomly removes one affix from an item but guarantees you receive shards equal to that affix’s tier. This is perfect when you’re hunting for specific, valuable shards.
Glyphs and Runes drop from enemies, chests, and Monolith echoes throughout the game. With the introduction of the Auto-Storing feature, these materials can be automatically sent to their dedicated storage tabs upon pickup, freeing up precious inventory space and ensuring your crafting sessions are never interrupted. Glyph of Hope is so common and valuable that you should never craft without one if you have any available.
Foundational Crafting Strategies
Your First Crafts
When you’re just starting, the goal isn’t to create perfect items, but to understand the flow of the system and use it to smooth your leveling experience. A simple and effective early strategy is:
- Pick up items with high Forging Potential and at least one useful affix for your build.
- Use your abundant Runes of Shattering on useless magic (blue) and rare (yellow) items to build your shard collection.
- Fill empty affix slots with stats that benefit your character—even at Tier 1, a complete set of resistances or damage modifiers provides a significant power boost.
- Upgrade your most important affixes first to Tier 2 or 3, using Glyph of Hope whenever possible to preserve precious Forging Potential.
Don’t be afraid to craft while leveling; the system is designed to be used constantly, and the shards you use early will be plentiful later. The experience you gain reading affixes and understanding stat priorities is more valuable than any material you might “save.”
Intermediate Tactics
As you approach the endgame, your strategies must evolve. Here are the core principles that will elevate your crafting:
- Prioritize Your Most Important Affixes First: If an item has both a Tier 3 health affix and a Tier 3 resistance affix, but health is more critical for your build, upgrade health first. This ensures that if you run out of Forging Potential, you’ve at least secured the most valuable stat at its highest possible tier.
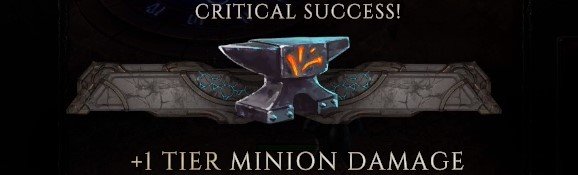
- Leverage the Critical Success System: Every craft has a small chance to be a Critical Success. When this happens, the craft is free (no shard cost, no FP cost), and a random affix below Tier 5 on the item gets a free upgrade. You can use this to your advantage by upgrading cheaper, lower-tier affixes first, hoping for a Critical Success that gives a free upgrade to a more expensive, higher-tier affix.
- Master Affix Manipulation: The Glyph of Chaos is your tool for fixing “bricked” affixes—those useless stats that are taking up a valuable slot. Use it on low-tier unwanted affixes early in the craft, before you’ve invested heavily in other mods, to try to roll something useful. Similarly, the Rune of Removal can be used with Glyph of Hope to systematically remove unwanted affixes from a good base while trying to preserve its Forging Potential.
Advanced Artificing
Sealed Affixes and the Fifth Modifier
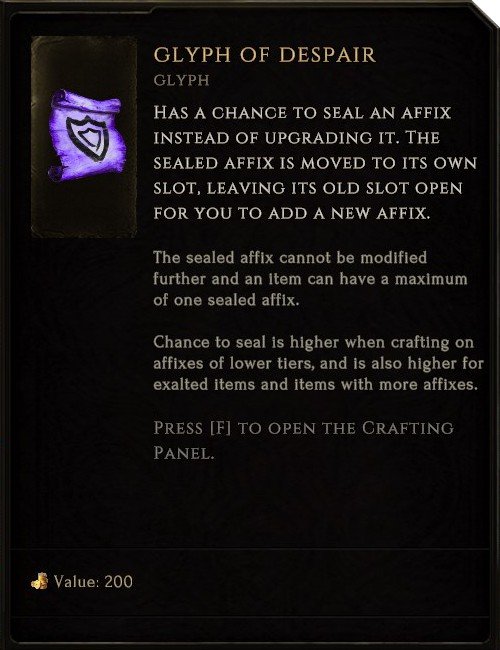
One of the most powerful advanced techniques involves the Glyph of Despair, a rare glyph that allows you to “seal” an affix. Sealing moves an affix to a special fifth slot, freeing up its original prefix or suffix slot for a new craft. The sealed affix can no longer be modified, but it remains active.
The chance to successfully seal an affix is high for Tier 1 (100%) and Tier 2 (69%) affixes, but drops significantly for higher tiers. This creates a powerful crafting sequence: you can seal a low-tier useful (but not perfect) affix to open a slot for a high-tier craft of your most desired stat. This is how you begin to create items that transcend normal limitations.
Imprints and Double T7 Items
Introduced with the Weaver’s Tree system, Imprints allow you to essentially “tell the timeline” what kind of items you’re looking for. By placing a piece of gear into an Imprint slot on the Weaver’s Tree, you influence future drops to be “similar items”—matching the base type, affixes, and even high Forging Potential of the imprinted item. This is the cornerstone of farming for the pinnacle of endgame crafting: the Double Tier 7 item.
Creating such a masterpiece is a multi-step process. Here is a proven method for crafting an item with two desired T7 prefixes:
- Crafting the Imprint Base: Start with an item that has two T7 suffixes (use Rune of Havoc to shuffle tiers until this is true), one prefix, and one open prefix. If the existing prefix is unwanted and Tier 1 or 2, use a Glyph of Despair to seal it. If it’s Tier 3 or higher, use a Rune of Removal to try and remove it. You now have a base with 2 T7 suffixes and an open prefix—imprint this onto your Weaver’s Tree.
- Crafting the Final Item: As you run content and get drops from your Imprint, take one of these new bases and:
- Craft your first desired prefix into the open slot.
- Seal the now-Tier 1 unwanted prefix with a Glyph of Despair.
- Craft your second desired prefix into the newly opened slot.
- Use Rune of Havoc to shuffle the affix tiers. With patience, this will eventually place both T7 tiers onto your two desired prefixes, creating your perfect item.
Legendary Crafting
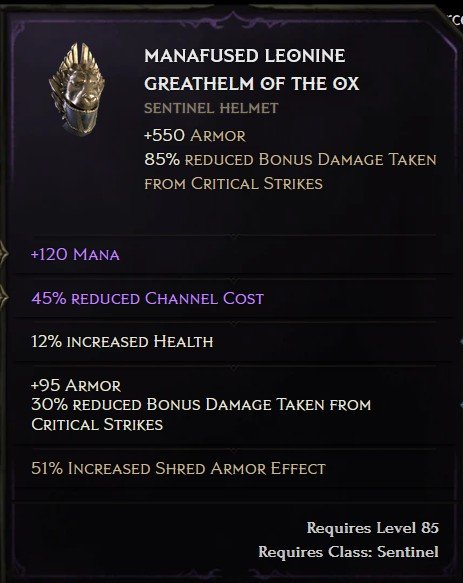
The apex of Last Epoch’s crafting system is the creation of Legendary Items. This process, performed in the Eternity Cache at the end of the Temporal Sanctum dungeon, allows you to fuse the powerful, fixed effect of a Unique item with the incredible raw stats of an Exalted item.
To begin, you need two things: a Unique item with Legendary Potential (LP) and an Exalted item of the same base type. The Legendary Potential (LP1-4) determines how many affixes from the Exalted item can transfer to the final Legendary product. A crucial quality-of-life improvement now allows players running Tier 2 or higher Temporal Sanctums to select one affix to guarantee onto their Unique item, with the remaining affixes (if any) chosen randomly based on LP. Furthermore, there is now a rare chance for a Critical Success during this process, which can seal an additional affix beyond the item’s Legendary Potential, making the pursuit of these items even more thrilling.
Final Thoughts
The path to becoming a master crafter in Last Epoch is a journey of incremental knowledge, bold experimentation, and occasional glorious failure. Do not be afraid to shatter gear, to try a risky Glyph of Chaos, or to see a valuable Exalted item fall to 0 Forging Potential. Each “failed” craft is a lesson that brings you closer to the moment you finally hold your perfect Double T7 Legendary